Saturday, November 30, 2013


Friday, November 29, 2013
Now available at PFD you can get this beautiful tube
with many layer options including wings that are removable.
Pick her up HERE


This kit has 45 papers and 135 elements.
Right now you can get this kit for 75% OFF!!!
The whole store is having a mega sale for a short time so don't miss out!


Wednesday, November 27, 2013
This Tutorial was Written By Me. Any Similarities are Coincidental.
Please do not Claim my Tutorials As Your Own.
These Tutorials are for Everyone to Try.
If you want to post my tuts in your PSP Groups, please post a text link back to this site.

SUPPLIES
I used photoshop cs6 but any version should do.
Template "436mpm" by Millies PSP Madness
Mask of choice
Font of choice
Let's get started!
Open template
Apply these papers to the layers listed below.
Use the clipping mask.
ctrl + alt + G
8 - Paper3
7 - Paper4
6 - Paper6
5 - Paper10
4 - Paper11
3 - Paper6
2 - Paper10
1 - Paper10
Once you have the papers as you like Merge them with
the layers you have clipped them to.
I also duplicate mine and add clear layer styles for extra shine and pop.
Add drop shadows.
Now open your tube and place over template.
Re-size as desired and sharpen.
Add drop shadow.
Open a close up of your tube and place over layer 8.
Create clipping mask.
Duplicate and add Gaussian blur.
Set to 7 and change blend mode to Darken.
Open Scatter
Place in front of layer 5.
Duplicate and place one on either side
of your tag.
Add drop shadow.
Open SnowyBranches
Place under your tube like she is sitting on it.
add drop shadow.
Open Snow
Place under SnowyBranches.
Open PineCones
Re-size as desired and sharpen.
Place on the bottom right side of your tag.
add drop shadow.
Open Swirl
Place in the center of your tag
Open Icicles
Place over layer 3 and add drop shadow.
Open Snowflake
Place on the left of your template.
Add drop shadow.
Duplicate and mirror.
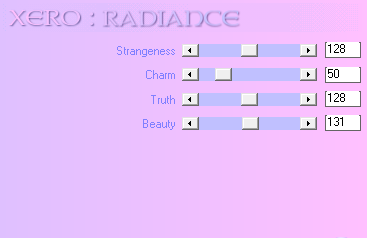
I added the filter Xero Radiance.
My settings are pictured below.
Add your name, copyright, save and you're done!
Thank you for following along!
Tuesday, November 26, 2013
This awesome Christmas kit has 145 elements and 60 papers.
You can get it HERE

Tube by Alex Prihodko

Tube by Ismael Rac
Roman has some brand new beauties coming soon.
Don't forget about his Bonus Bonanza going on now.
Check it out at his store.


Monday, November 25, 2013
This kit has 38 papers and 130 elements.
It is a beautiful pink kit that you will love.
Get it HERE

Tube by Pinup Toons.

Tube by Keith Garvey
Saturday, November 23, 2013
This beautiful tube from Verymany has many layer options so you can use
her for the Holidays and after they are over.
She is available now at PFD.
Check out the matching kit from Kizzed by Kelz also available at PFD.
Check out the matching kit from Kizzed by Kelz also available at PFD.


Friday, November 22, 2013
TODAY ONLY (11/22/2013) SPEND ANY $ IN STORE AND ADD THIS BEAUTY TO YOUR CART FOR FREE. You no longer have to wait just pop her in your cart!


Wednesday, November 20, 2013


JUST ADD THIS TUBE AND KIT TO YOUR CART WHEN YOU SPEND ANY $ IN THE STORE TODAY ONLY! NO NEED TO EMAIL IN ANYMORE ITS ALL IN YOUR CART. WHEN YOU GO TO CHECK OUT JUST ADD THIS TODAY ONLY SPECIAL.
Get it HERE


Tuesday, November 19, 2013
This gorgeous kit has 165 elements and 50 papers.
It is super versatile (See tags) with Many different tagging options
in just one kit!
Pick it up HERE
Pick it up HERE

Tube by Tony T.

Tube by Kurama Phoenix.


Ismael has a bunch of new releases for you today.
Stop by and pick up all of these awesome goodies!

Monday, November 18, 2013
This Tutorial was Written By Me. Any Similarities are Coincidental.
Please do not Claim my Tutorials As Your Own.
These Tutorials are for Everyone to Try.
If you want to post my tuts in your PSP Groups, please post a text link back to this site.

SUPPLIES
I used photoshop cs6 but any version should do.
Tube "Lucy" by Di Halim
Kit "Candy Cane Kit" by Tiny Turtle Designs
Template "Kandeechristmas2012-3" by Dees'Sign Depot
Mask of choice
Font of choice
Let's get started!
Open template
Apply these papers to the layers listed below.
Use the clipping mask.
ctrl + alt + G
gradient rectangle - Candy Cane Papers (41)
glitter strips - Add drop shadow
top green square - Candy Cane Papers (12)
glitter strips - Add drop shadow
green square - Candy Cane Papers (12)
top dotted strip - Leave as is
bottom dotted strip - Leave as is
white strip - Candy Cane Papers (24)
green strip - Candy Cane Papers (29)
red rectangle - Candy Cane Papers (3)
dotted rectangle - Add style of choice
white rectangle - Candy Cane Papers (19)
glitter strips - Add drop shadow
top green square - Candy Cane Papers (12)
glitter strips - Add drop shadow
green square - Candy Cane Papers (12)
top dotted strip - Leave as is
bottom dotted strip - Leave as is
white strip - Candy Cane Papers (24)
green strip - Candy Cane Papers (29)
red rectangle - Candy Cane Papers (3)
dotted rectangle - Add style of choice
white rectangle - Candy Cane Papers (19)
Once you have the papers as you like Merge them with
the layers you have clipped them to.
I also duplicate mine and add clear layer styles for extra shine and pop.
Add drop shadows.
Now open your tube and place over template.
Re-size as desired and sharpen.
Add drop shadow.
Open Candy Cane Elements (129)
Place at the back of your tag.
Add drop shadow.
Open Candy Cane Elements (141)
Place over element 129 and add drop shadow.
Duplicate, Flip Vertical and then flip Horizontal.
Open Candy Cane Elements (141)
Place over element 129 and add drop shadow.
Duplicate, Flip Vertical and then flip Horizontal.
Open Candy Cane Elements (133)
Re-size as desired and sharpen.
Duplicate and place as desired around the wordart.
Duplicate and place as desired around the wordart.
add drop shadow.
Open Candy Cane Elements (142)
Re-size as desired and sharpen.
Duplicate and place behind element 133.
Duplicate and place behind element 133.
add drop shadow.
Open Candy Cane Elements (149)
Place center of white rectangle
Re-size as desired and sharpen.
Add drop shadow.
If you're using a sitting tube like I am
open Candy Cane Elements (144)
Re-size as desired and sharpen.
Place underneath your tube so that
it sits on top of the element.
Add drop shadow.
Add your name, copyright, save and you're done!
Thank you for following along!
This kit is full of golden beauty for your tagging pleasure.
You can pick up this beautiful kit at Scrap Candy now.

Tube by Arthur Crowe.

Tube by Di Halim.
This is a truly gorgeous kit with 130 elements and 30 papers.
You will be making tons of classic golden winter/Christmas tags with it.
Pick it up HERE


This adorable tube comes with a bunch of different layer options.
Change the colors, Remove the words or snowflakes!
Get it HERE


Sunday, November 17, 2013
This Tutorial was Written By Me. Any Similarities are Coincidental.
Please do not Claim my Tutorials As Your Own.
These Tutorials are for Everyone to Try.
If you want to post my tuts in your PSP Groups, please post a text link back to this site.

SUPPLIES
I used photoshop cs6 but any version should do.
COMING SOON - "2013 Pinup Pose" and matching kit!
Keep an eye on Ismael Racs store HERE
Keep an eye on Ismael Racs store HERE
Font of choice
Mask of Choice
Let's get started!
Open a new canvas 700 x 700
Open frame 2
Place center on your canvas.
Re-size as desired and sharpen.
Add drop shadow.
Open wordart
Place at the top of your frame so that
it looks like it's hanging off of it.
Re-size as desired and sharpen.
Add drop shadow.
Now open your tube and place
on the right side of your frame.
Flip Horizontal.
on the right side of your frame.
Flip Horizontal.
re-size as desired and sharpen.
Add drop shadow.
Open snowflake dangle
Place behind your Frame.
Place on the right side of your frame.
Duplicate and flip horizontal placing that on the left.
Duplicate and flip horizontal placing that on the left.
Erase edges sticking outside of the top part of your frame.
Open Paper 11
Place behind your Frame.
Highlight your Frame and use your magic want to select inside.
ctrl + alt + I to inverse.
Now highlight your paper and erase the outside edges.
ctrl + D to deselect.
Open sparkles
Place over the center of your tag.
Open gifts
Re-size as desired and sharpen.
Place on the bottom left side of your tag.
Add drop shadow.
Open gift box
Re-size as desired and sharpen.
Place on the bottom left side of your tag behind Gifts.
Add drop shadow.
Open flower
Place at the top of your frame.
Re-size as desired and sharpen.
Add drop shadow.
Now place your tube over paper 11
ctrl + alt + C to create clipping mask.
Change the blend mode to Luminosity.
Add drop shadow.
Now place your tube over paper 11
ctrl + alt + C to create clipping mask.
Change the blend mode to Luminosity.
Apply mask of choice.
I used Paper 15 on mine.
I applied Xero> Radiance.

Add your name, copyright, save and you're done!
Thank you for following along!
P-O Concept is all snuggled up in her new home at PFD and
this brand new kit "Star Fall Beauty" is packed with options.
With 101 elements and 16 papers you have all kinds of tag making potential!
Pick it up HERE

Tube by Zindy S.

Tube by Verymany.
This Tutorial was Written By Me. Any Similarities are Coincidental.
Please do not Claim my Tutorials As Your Own.
These Tutorials are for Everyone to Try.
If you want to post my tuts in your PSP Groups, please post a text link back to this site.

SUPPLIES
I used photoshop cs6 but any version should do.
Tube "Clasic" by Roman Zaric
Kit "Vintage Autumn" by Bookworm Dezines
Font of choice
Mask of Choice
Let's get started!
Open a new canvas 700 x 700
Open BD-Element56
Place center right on your canvas.
Re-size as desired and sharpen.
Add drop shadow.
Now open your tube and place center left.
re-size as desired and sharpen.
Add drop shadow.
Open BD-Element33
Place behind your tube.
Re-size and sharpen as desired.
Add drop shadow.
Open BD-Element13 & BD-Element4
Re-size and sharpen as desired.
Add drop shadow.
Open BD-Element24
Re-size as desired and sharpen.
Place on the right behind your tube.
Add drop shadow.
Open BD-Element42
Place over Element56
Re-size as desired and sharpen.
Line it up with the clock as best you can.
(See tag for placement)
Open BD-Element54
Place on the bottom right side of your tag.
Re-size as desired and sharpen.
Add drop shadow.
Duplicate and flip horizontal.
Place on the upper left side of tag.
Open BD-Element19
Place behind your tube on the right side of your tag.
Re-size as desired and sharpen.
Add drop shadow.
Add drop shadow.
Apply mask of choice.
I used BD-Paper7 on mine.
I applied Xero> Radiance.
Add your name, copyright, save and you're done!
Thank you for following along!
Tiny Turtle has done it again!
Pick this adorable kit up HERE

Tube by Ismael Rac

Tube by Roman Zaric
Friday, November 15, 2013
Now available at PFD this gorgeous lady comes with
a ton of different layer options for your tagging pleasure.
Check her out HERE


Do NOT miss out on this amazing Bonus Bonanza going on now.
This is your chance to pick up those bonus tubes you missed out on.
Get them HERE


Subscribe to:
Posts
(Atom)


Where I sell!


