Showing posts with label Ninaste. Show all posts
Showing posts with label Ninaste. Show all posts
Tuesday, October 29, 2013
I made these tags using the GORGEOUS kit "Christmas Fairy" from Tiny Turtle Designs. It has 210 elements and 39 papers. It was made to match the tube featured in the tags below called "Toxic Fairy" from Ninaste.


Monday, October 28, 2013
This Tutorial was Written By Me. Any Similarities are Coincidental.
Please do not Claim my Tutorials As Your Own.
These Tutorials are for Everyone to Try.
If you want to post my tuts in your PSP Groups, please post a text link back to this site.

SUPPLIES
I used photoshop cs6 but any version should do.
Template "Template 137" by Millies PSP Madness
Mask by Moonbeams & Spiderwebs
Font of choice
Let's get started!
Open template
Re-size canvas to 700 x 700
Re-size canvas to 700 x 700
Apply these papers to the layers listed below.
Use the clipping mask.
ctrl + alt + G
8 - Snow Fairy Papers (22)
6 & 7 - Snow Fairy Papers (6)
3 & 4 - Snow Fairy Papers (39)
1 & 2 - Snow Fairy Papers (36)
1 & 2 - Snow Fairy Papers (36)
Once you have the papers as you like Merge them with
the layers you have clipped them to.
I also duplicate mine and add clear layer styles for extra shine and pop.
Add drop shadows.
Now apply colors of choice to layer 5 and 10.
Apply style of choice to the template word art.
Now apply colors of choice to layer 5 and 10.
Apply style of choice to the template word art.
Now open your tube and place over template.
Re-size as desired and sharpen.
Add drop shadow.
Open your close up and place over center circle.
Clip it to the layer and change blending mode to Overlay.
Open your close up and place over center circle.
Clip it to the layer and change blending mode to Overlay.
Open Snow Fairy Elements (46)
Place behind your tube.
Re-size as desired and sharpen.
Add drop shadow.
Duplicate and mirror.
Re-size as desired and sharpen.
Add drop shadow.
Duplicate and mirror.
Open Snow Fairy Elements (66)
Duplicate and place on
either side of your close ups.
Re-size as desired and sharpen.
Add drop shadow.
Add drop shadow.
Open Snow Fairy Elements (69)
Place next to 66 and repeat same steps above.
Open Snow Fairy Elements (6)
Place behind layer 8
Add drop shadow.
Add drop shadow.
Open Snow Fairy Elements (59)
Place on the left side of your tag.
Flip 90 and place as desired.
Add drop shadow.
Flip 90 and place as desired.
Add drop shadow.
Open Snow Fairy Elements (77)
Place behind your tube on the far right
side of your template.
Re-size as desired and sharpen.
Open Snow Fairy Elements (37)
Place on the bottom of your template next to your tube.
Re-size as desired and sharpen.
Add drop shadow.
Now add an assortment of flowers from the kit
and place as desired.
side of your template.
Re-size as desired and sharpen.
Open Snow Fairy Elements (37)
Place on the bottom of your template next to your tube.
Re-size as desired and sharpen.
Add drop shadow.
Now add an assortment of flowers from the kit
and place as desired.
Add your mask.
I used Snow Fairy Papers (38) on mine.
I applied Xero> Radiance.

Add your name, copyright, save and you're done!
Thank you for following along!
Saturday, October 19, 2013
This Tutorial was Written By Me. Any Similarities are Coincidental.
Please do not Claim my Tutorials As Your Own.
These Tutorials are for Everyone to Try.
If you want to post my tuts in your PSP Groups, please post a text link back to this site.

SUPPLIES
I used PSP X5
Tube "Harvest Angel" Ninaste
Kit "Pink Harvest Angel Kit" Tiny Turtle Designs
Muras Meister/Copies
Tramages/Tow The Line
Filter Factory/Diamond Glass
Open a new canvas 600 x 250
Open your tube copy and paste as new layer on your canvas.
Effects/Muras Meister/Copies/wallpaper

Effects/Filter Factory/Diamond Glass

Open Pink Harvest Angel Elements (255)
Place across your canvas.
See my tag for placement.
Add drop shadow 1/1/80/8 repeat with -1/-1/80/8
Crop photo to get rid of outer edges.
Copy and paste your tube again. Place on the right side.
Size as desired and sharpen.
Repeat drop shadow.
Highlight your bottom layer.
Use your selection tool to select the bottom half of your tag
under element 255.
Adjust/blur/Gaussian Blur

Keep selected and go to effects/Tramages/Tow The Line

Now you can deselect.
Crop your image again.
Selections/Select all/Modify/Contract by 5
Add a new raster layer/selections/invert
flood fill with color of choice/deselect.
Take the opacity on your border to 60%
Add drop shadow 1/1/80/3 repeat with -1/-1/80/3
Now add some elements!
I used
Pink Harvest Angel Elements (227)
Pink Harvest Angel Elements (251)
Pink Harvest Angel Elements (275)
Pink Harvest Angel Elements (1)
Pink Harvest Angel Elements (224)
Pink Harvest Angel Elements (271)
Pink Harvest Angel Elements (277)
Place these or other as desired.
You can refer to my tag or just play around
and make it your own.
Add your name and copyright.
Save and you're done!
Thank you for following along!!
Friday, October 18, 2013
For these tags I used "Exclusive Mega Store Kit" from Tiny Turtle Designs.
This kit is PACKED with 300 elements and 70 papers!!!
You seriously must have this kit!
You can pick it up HERE
You seriously must have this kit!
You can pick it up HERE

Tube by Ninaste

Tube by Roman Zaric
Tuesday, September 10, 2013
This Tutorial was Written By Me. Any Similarities are Coincidental.
Please do not Claim my Tutorials As Your Own.
These Tutorials are for Everyone to Try.
If you want to post my tuts in your PSP Groups, please post a text link back to this site.

SUPPLIES
I used photoshop cs6 but any version should do.
TUBE - "Sexy Cop" by Ninaste.
You must purchase this art to use it.
You can get it HERE
KIT - "Sexy Cop" by Hania's Design
I used photoshop cs6 but any version should do.
TUBE - "Sexy Cop" by Ninaste.
You must purchase this art to use it.
You can get it HERE
KIT - "Sexy Cop" by Hania's Design
You must purchase this kit to use it.
You can get it HERE
You can get it HERE
Let's get started!
Open Temp 45.
Size up your canvas size for a little more working room.
Open Paper-01 and place over layer 4.
ctrl + alt + G to create clipping mask.
Merge layers and add drop shadow.
On layers 1 & 11 go to filters > Alien Skin Eye Candy 7 > Brushed Metal.
Use Circular settings keeping the color default.
Size up your canvas size for a little more working room.
Open Paper-01 and place over layer 4.
ctrl + alt + G to create clipping mask.
Merge layers and add drop shadow.
On layers 1 & 11 go to filters > Alien Skin Eye Candy 7 > Brushed Metal.
Use Circular settings keeping the color default.
Add drop shadow.
Open Paper-02 and apply to layers 5 & 8.
ctrl + alt + G to create clipping mask.
Merge layers and add drop shadow.
Open Paper-02 and apply to layers 5 & 8.
ctrl + alt + G to create clipping mask.
Merge layers and add drop shadow.
Open a close up of your tube.
Place it in the center of layer 11 and again
create clipping mask.
Change your blending mode to overlay.
Add drop shadow.
Now flood fill layers 3, 7, 10 & 12 with
Change your blending mode to overlay.
Add drop shadow.
Now flood fill layers 3, 7, 10 & 12 with
a color of choice from your tube.
Add bevel and drop shadow.
Flood fill layers 13 & 14 (Word Art)
With colors from your tube.
Add drop shadows, Bevels and Satin from your blending options.
Now open your tube again and duplicate.
Add bevel and drop shadow.
Flood fill layers 13 & 14 (Word Art)
With colors from your tube.
Add drop shadows, Bevels and Satin from your blending options.
Now open your tube again and duplicate.
Place over layers 5 & 8.
Position differently so that different parts of the tube are showing
Position differently so that different parts of the tube are showing
in each frame.
ctrl + alt + G to create clipping mask.
ctrl + alt + G to create clipping mask.
ELEMENTS
52
88
80
79
17
01
Arrange these as desired or refer
to my tag for reference.
Add drop shadows.
Add your name/quote.
Don't forget your copyright!
Thank you so much for following along.
Add drop shadows.
Add your name/quote.
Don't forget your copyright!
Thank you so much for following along.
This Tutorial was Written By Me. Any Similarities are Coincidental.
Please do not Claim my Tutorials As Your Own.
These Tutorials are for Everyone to Try.
If you want to post my tuts in your PSP Groups, please post a text link back to this site.

This tutorial is PTU
SUPPLIES NEEDED
I used Photoshop cs6 but any should do.
Tube - "Sexy Sailor" from Ninaste.You must purchase a license to use this artists work.
You can do so HERE
Kit - "Sailor Girl" by Amy Marie's Kit's
You must purchase this kit to use it.
You can do so HERE
Template - I used Temp 28 I made.
You can download it for free HERE
Let's get started!
hit ctrl + alt + G to create a clipping mask then position in layer as desired.
Repeat with the listed layers below.
pp2 - Layer 5
pp3 - Layer 3
pp1 - Layer 7 - re-size to 50%
pp016 - Layer 9 - re-size to 10%
Now go ahead and highlight the paper you made a clipping mask and the layer you applied it to. right click them and merge layers. Duplicate and apply these settings to the bottom layer using your blending options.
Do this for all layers you applied papers to.
Fill Opacity 0%
OUTER GLOW
Blend Mode - Vivid Light
Now go ahead and highlight the paper you made a clipping mask and the layer you applied it to. right click them and merge layers. Duplicate and apply these settings to the bottom layer using your blending options.
Do this for all layers you applied papers to.
Fill Opacity 0%
OUTER GLOW
Blend Mode - Vivid Light
Opacity - 75%
Noise 0%
Color - White
Technique - Softer
Spread - 0%
Size - 15px
Noise 0%
Color - White
Technique - Softer
Spread - 0%
Size - 15px
Contour - Half Round
Range - 50%
Jitter - 0%
Range - 50%
Jitter - 0%
SATIN
Blend Mode - Vivid Light
Color - #f2f2f2
Opacity - 70%
Distance - 11px
Distance - 11px
Size - 14px
Contour - Gaussian > Invert
INNER GLOW
Blend Mode - Vivid Light
Opacity - 75%
Blend Mode - Vivid Light
Opacity - 75%
Noise - 0%
Color - #dfdfdf
Color - #dfdfdf
Technique - Softer
Source - Center
Choke - 0%
Choke - 0%
Size - 16px
Contour - Gaussian - Inverse
Range - 50%
Jitter - 0%
CONTOUR
Notched Slope
BEVEL & EMBOSS
Style - Outer Bevel
CONTOUR
Notched Slope
BEVEL & EMBOSS
Style - Outer Bevel
Technique - Smooth
Depth - 100%
Direction - Up
Size - 16px
Soften - 0%
Gloss Contour - Linear
Highlight Mode - Vivid Light > Color e0e0e0 > Opacity 75%
Shadow Mode - Multiply > Color 000000 > Opacity 75%
Shadow Mode - Multiply > Color 000000 > Opacity 75%
Flood fill layers 11 and 12 with the color blue.
Open element 97 and re-size so that it fits over layers 11 and 12.
Sharpen and duplicate. Place one over each layer.
Now flood fill your frame layers 2, 4, 6, 8 and 10 with red and blue matching your tube I also added a white stroke and drop shadow.
Open element 97 and re-size so that it fits over layers 11 and 12.
Sharpen and duplicate. Place one over each layer.
Now flood fill your frame layers 2, 4, 6, 8 and 10 with red and blue matching your tube I also added a white stroke and drop shadow.
Now open your tube and place over layer 10.
reference picture for placement.
Add drop shadow.
reference picture for placement.
Add drop shadow.
Now add these elements.
39 - Flip Horizontal and place behind layer 12
116 - Place centered over layers 1 & 3 see picture for reference.
Add drop shadow.
Add drop shadow.
100 - Place above layer 10. Re-size so that one end is sitting on the left corner of layer 1 and the other corner ends at the right corner of layer 7.
See picture for reference. Sharpen and add drop shadow.
65 - re-size to 40% place next to element 39.
Add drop shadow.
Add drop shadow.
77 - place over the bottom half of your tube.
See picture for reference.
See picture for reference.
Add drop shadow.
11 - re-size to 50% and sharpen.
Place on the right side of your tube like it's sitting on element 77.
See picture for reference.
Add drop shadow.
Place on the right side of your tube like it's sitting on element 77.
See picture for reference.
Add drop shadow.
6 - Duplicate and place one at the top left corner.
Place the other at the bottom of the right corner.
See picture for reference.
Place the other at the bottom of the right corner.
See picture for reference.
Add drop shadow.
Add your name/quote and copyrights
Save and you're done!
Add your name/quote and copyrights
Save and you're done!
This Tutorial was Written By Me. Any Similarities are Coincidental.
Please do not Claim my Tutorials As Your Own.
These Tutorials are for Everyone to Try.
If you want to post my tuts in your PSP Groups, please post a text link back to this site.

Supplies
The tube I used is "Demi" by Ninaste
You must have a license to use their work.
You can purchase it HERE
The PTU kit I used is "Angeline 1" by Tiny Turtle Designs.
You can purchase it HERE
Open a new canvas
850 x 850
now open temp 39
and place on your new canvas.
Open Angeline 1 (12) and re-size to 40% place over layer 1, hit alt + ctrl + G to create clipping mask. Duplicate and repeat clipping mask on layer 9.
open Angeline 1 (18) and place over layer 3, hit alt + ctrl + G to create clipping mask. Duplicate and repeat clipping mask on layer 5.
Open your tube and place on your new canvas.
Now pick two colors from your tube and on layer 7 and 15 add a gradient then go to Layer> Rasterize> Layer Style.
Duplicate your tube and hide original. working with the copy place over layer 7 and alt + ctrl + G to create clipping mask. Flip Horizontal and rotate to your liking . duplicate and hide dup. Now change the blending options on the bottom tube layer to screen. unhide dup of your tube and it's blending options to multiply.
Now open Angeline 1 (146) Rotate 90 and re-size so that it fits over layer 15.
Sharpen and alt + ctrl + G to create a clipping mask.
Open Angeline 1 (10) and re-size to 30% and duplicate. place over layer 11 and 13 alt + ctrl + G to create clipping mask.
now go into your blending options. add color overlays, bevels, satins, and drop shadows as you desire to layers 2, 4, 6, 8, 10, 12, 14 and 16. these layers are your borders on this template. I used a style that I purchased and will be linked above.
now you can unhide your original tube and place in front of layer 15.
open Angeline 1 (2) and place on the left bottom side of your template. re-size to 40% sharpen and add drop shadow.
open Angeline 1 (104) and re-size to 80% rotate and place behind layer 3 (refer to picture) sharpen and add a drop shadow.
open Angeline 1 (128) and place at the bottom right side of your template on layer 3, re-size to 25% and sharpen and add drop shadow. Duplicate Angeline 1 (128) and place over layer 5. rotate slightly and size down just a bit. place Angeline 1 (131) behind Angeline 1 (128) re-size, sharpen and add a drop shadow. repeat on opposite side on layer 5.
Now add your mask of choice. I used Angeline 1 (30) on my mask.
Add your text and copyrights and you are all finished.
Thank you for following this tutorial.
This Tutorial was Written By Me. Any Similarities are Coincidental.
Please do not Claim my Tutorials As Your Own.
These Tutorials are for Everyone to Try.
If you want to post my tuts in your PSP Groups, please post a text link back to this site.

WHAT YOU WILL NEED
I used photoshop cs6 but any should do.
The Tube I used is "ANGELINE" by Ninaste
You can purchase her HERE
I used Angeline 2 Matching kit by Tiny Turtle Designs.
You can get it HERE
Mask of choice.
I used Zuzzmask75
You can get it HERE
I used 246mpm Millies PSP Madness
You can get it HERE
You can get it HERE
Lets get started!
Open a new canvas size 800 x 800
Place the template on your new canvas.
Using Angeline 2 (19)
Put it over layer 5 and re-size as desired.
hit ctrl + alt + G to create a clipping mask.
Layer> Merge Down.
Sharpen and add drop shadow.
Place Angeline 2 (15) over layer 1
re-size to around 80%
Use the picture as a reference
but feel free to re-size and place as you desire.
Now use Angeline 2 (28) for your mask.
Make sure your text and copyrights are placed clearly


hit ctrl + alt + G to create a clipping mask.
Layer> Merge Down.
Sharpen and add drop shadow.
Place Angeline 2 (2) over layer 2
hit ctrl + alt + G to create a clipping mask.
Layer> Merge Down.
Sharpen and add drop shadow.
Place Angeline 2 (3) over layer 3
re-size to about 66% and sharpen.
Place Angeline 2 (3) over layer 3
re-size to about 66% and sharpen.
hit ctrl + alt + G to create a clipping mask.
Layer> Merge Down.
add drop shadow.
Place Angeline 2 (34) over layer 4
Re-size to 65% and sharpen.
hit ctrl + alt + G to create a clipping mask.
Layer> Merge Down.
add drop shadow.
Place Angeline 2 (34) over layer 6
Re-size to 40% and sharpen.
hit ctrl + alt + G to create a clipping mask.
Layer> Merge Down.
add drop shadow.
Now add a close up of your tube and place
it over layer 6.
hit ctrl + alt + G to create a clipping mask.
You can add a texture/pattern if you would like
I added a simple line pattern.
hit ctrl + alt + G to create a clipping mask.
You can add a texture/pattern if you would like
I added a simple line pattern.
Add your full size tube.
Place on the right side of your template
Place on the right side of your template
and flip horizontal.
Now you can start adding your elements
I used
Angeline 2 (2)
Angeline 2 (9)
I used
Angeline 2 (2)
Angeline 2 (9)
Angeline 2 (23)
Angeline 2 (43)
Angeline 2 (52)
Angeline 2 (64)
Angeline 2 (58)
Angeline 2 (98)
Angeline 2 (7)
Angeline 2 (104)
Use the picture as a reference
but feel free to re-size and place as you desire.
Now use Angeline 2 (28) for your mask.
Make sure your text and copyrights are placed clearly
on your tag and save as a PSD and PNG.
Now I took my PNG file into PSP and added a couple filters.
Xero>Porcelain and Xero>Radiance
Use the settings below.
Now I took my PNG file into PSP and added a couple filters.
Xero>Porcelain and Xero>Radiance
Use the settings below.
Thank you so much for following along with this quick and easy Tut!
This Tutorial was Written By Me. Any Similarities are Coincidental.
Please do not Claim my Tutorials As Your Own.
These Tutorials are for Everyone to Try.
If you want to post my tuts in your PSP Groups, please post a text link back to this site.

WHAT YOU WILL NEED
I used photoshop cs6 but any should do.
The Tube I used is the brand new Beauty "ANGELINE" by Ninaste
You can purchase her HERE
I used the matching kit "Angeline 1" by Tiny Turtle Designs
You can get the kit HERE
Mask of choice.
Lets get started!
Open your template
Hide all layers but the bottom two.
Open Angeline 1 (12)
place over shape 1 R and re-size to 30%
hit ctrl + alt + G to create a clipping mask.
Layer> Merge Down.
Sharpen and add drop shadow.
Now repeat these same steps with Shape 1 L.
Now unhide Shape 2
Open Angeline 1 (30)
and place over shape 2
re-size to 55%
hit ctrl + alt + G to create a clipping mask.
Layer> Merge Down.
Sharpen and add drop shadow.
Now unhide shape 3
Open Angeline 1 (28)
Place over shape 3
re-size to 70%
hit ctrl + alt + G to create a clipping mask.
Layer> Merge Down.
Sharpen and add drop shadow.
Unhide shape X
Place Angeline 1 (1) over shape X
re-size to 60%
hit ctrl + alt + G to create a clipping mask.
Layer> Merge Down.
Sharpen and add drop shadow.
Now that you have all of the shapes styled
you can go through and
duplicate each shape and add the clear style
I have provided at the beginning of this TUT.
You do not have to do this but
it does give the layers a very nice look.
Now add your tube and re-size as desired.
Sharpen and add a slight drop shadow.
Now add elements
Angeline 1 (72)
Angeline 1 (104)
Angeline 1 (120)
Angeline 1 (115)
Angeline 1 (112)
Angeline 1 (130)
Angeline 1 (128)
Angeline 1 (147)
Angeline 1 (142)
Angeline 1 (82)
Using these elements re-size and place as desired.
Don't forget to sharpen after re-sizing.
Now open your mask.
I used Angeline 1 (18) for my mask.
Add your text and copyrights last and you are ready to show
Add your text and copyrights last and you are ready to show
off your creation!
Thank you for following along with this tutorial and as always
Thank you for following along with this tutorial and as always
I would love to see your results.
This Tutorial was Written By Me. Any Similarities are Coincidental.
Please do not Claim my Tutorials As Your Own.
These Tutorials are for Everyone to Try.
If you want to post my tuts in your PSP Groups, please post a text link back to this site.

Items you will need to follow this tutorial.
Photoshop cs6
The beautiful artwork "Kawaii Cutie" by Ninaste
The kit "Summer Fantasy Kit" by Tiny Turtle Designs
Now lets get started!
Open a new canvas 900 x 800
and place the template on it.
Open a new canvas 900 x 800
and place the template on it.
Place Coralie (45) over Shape 3.
hit ctrl + alt + G to create a clipping mask.
Layer> Merge Down.
Add drop shadow.
Open Fairy Magic (28) and duplicate.
Place original over shape 1
hit ctrl + alt + G to create a clipping mask.
Layer> Merge Down.
Repeat with the duplicate on shape 2.
Go into your blending options
and add an inner shadow to both shape 1 and 2
using the settings pictured below.

Now add Fairy Magic (23)
To the bottom layers named swirls.
hit ctrl + alt + G to create a clipping mask.
Layer> Merge Down.
Add a drop shadow
I used the settings but upped the
Opacity to 100%
Open Coralie (92)
Place over shape 4 and
hit ctrl + alt + G to create a clipping mask.
Layer> Merge Down.
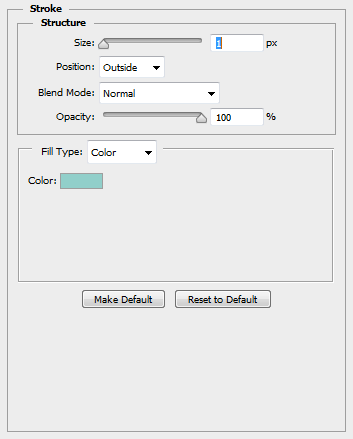
Add a drop shadow and stroke using the settings
pictured below.

Open coralie (86)
place under the template wordart
re-size to 75% and sharpen.
Add drop shadow.
Open coralie (91)
Place above shape 1 on the left side
and duplicate.
Place duplicated element on the right side
of your template above shape 2
Flip Horizontal>Flip Vertical.
On shape3 using the settings pictured
below add a dark outer glow

Now open up the tubes close up.
Re-size if desired and place over shape 3.
hit ctrl + alt + G to create a clipping mask.
Add a small drop shadow to your close up.
Now add a color of choice to
the template text art.
I used a dark purple to play off the colors
on the tube art.
Add a drop shadow to your stroke text art.
Now that you have the main body of the tag done
it is time to add your elements.
Open
Coralie (56)
Coralie (72)
Coralie (69)
Fairy Magic (8)
Moonlight Fantasy (56)
Moonlight Fantasy (68)
Moonlight Fantasy (78)
Coralie (79)
Now using these elements size to various sizes and
place around the center where your tube
is placed.
Now add your mask and place Coralie (44)
over it and hit ctrl + alt + G to create a clipping mask.
Layer> Merge Down.
Now make sure to place your copyrights so that they are
Clear and visible.
I wrote this tutorial in photoshop CS6 but with the finished product
I did go into PSP and added the filter
Xero>Porcelain
The settings I used are pictured below.

Thank you so much for following along!
I would love to see your creations.
Subscribe to:
Posts
(Atom)




Where I sell!